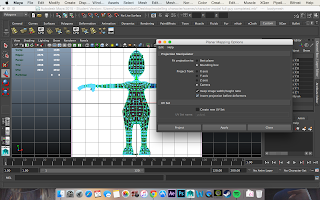
Now that I've modelled my Maya character I then had to give it a UV texture map, which it already had but if you went onto the UV texture mapping screen you would of seen a bunch of lines scattered all over the place like someone's just scribbled on a piece of paper. We had to give it a new UV texture map because it will make adding texture to the model easier later. I did this by going to the 'create UV's' menu and then went to 'planar mapping options' and made sure that 'bounding box', 'camera', 'keep image width/height ratio' and 'insert projection before deformers' boxes were ticked before clicking 'Project'. Doing this will make a 3D UV texture map of the model, which is better that all the squiggly lines before, however not the fine step of creating the UV texture map. After creating the 3D texture map of the model I used the 'cut UV edges' tool to separate the model into 9 parts (head, 2 arms, 2 hands, 2 legs, 2 feet, and 2 souls).
Afterwards, I then had to cut down one half of the arms, legs, souls, and head so that when I unfold the 3D texture it will flatten correctly. Luckily there is a tool in maya that does all of the flattening for you and it's called 'Unfold 3D', which basically takes the 3D texture map and unfolds it like a net for you and then all you have to do is neaten the UV texture map up afterwards so you understand what/where everything is.
Overall I found this quite challenging because a part of my foot on the model didn't get UV textured properly for some reason, so I had to get my tutor to help my sort that out but when my tutor tried to sort it maya kept crashing on me. I finally got maya to stop crashing and we sorted it out and now my UV texture maps are good.


No comments:
Post a Comment