During are crit today Oscar and I stood up in front of the class room and gave a presentation about are project and what we're doing and why.
I felt that we gave a good presentation and we communicated what we wanted to do confidently by telling people about are characters, some concept design and also showing them are storyboard. Oscar and I also talked about are colour pallet and asked for feedback, so what we got people saying to look at the Tim Burton's Alice in Wonderland for reference to the worm colour and for the spider colour they said to experiment with block colour and to look at movies we like to get colour pallets from them.
We also got told to look at directing the sun light in maya to experiment on where we want the sun to be i.e. morning sun, sunset orange etc.
Looking at the characters peers have told us to investigate using IK splines and ribbon splines for the inch worms to make it squish. However, one of are tutors pointed out that the spider had no motive to jump off the edge of the branch, so we have to come up with a motivation so that are story makes sense and that there are no loop holes in it.
Monday 26 October 2015
Character and Narrative: Rough Storyborad
Are story goes as followed:
There is a spider looking over a branch ledge, the camera pans over the spider to see what down below, we see a person laying against the tree minding its own business. The spider backs away from the ledge of the branch, we hear a sound coming from behind the spider, the camera pans sideways to see what the sound is, we see an inch worm slowly making its way towards the edge.
The inch worm looks over the edge to see the person laying against the tree, the worm temps the spider to jump over the edge, the inch worm jumps over, the spider is now pumping its self up to jump off whilst the camera is getting the different shots of the spider.
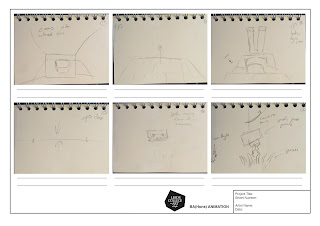
The camera then goes into the spider so that we see what the spider sees, we (being the spider) move closer to the edge and goes over the edge to see the person, spiders eyes close and it takes a big breath and jumps off, camera then goes to the bottom of tree to see the spider coming down, the spider latches onto the grass to stop its self from flying back up because the spider is still attached to the branch by is web.
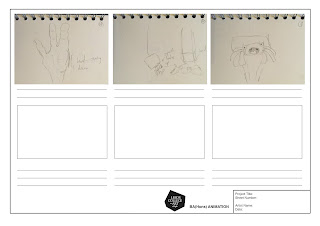
The spider looks up and sees the the inch worm, inch worm gives spider thumbs up, a hand suddenly appears and squishes inch worm, and the spider sees the hole thing and lets go of the grass and flings back up to the branch, the end!
There is a spider looking over a branch ledge, the camera pans over the spider to see what down below, we see a person laying against the tree minding its own business. The spider backs away from the ledge of the branch, we hear a sound coming from behind the spider, the camera pans sideways to see what the sound is, we see an inch worm slowly making its way towards the edge.
The inch worm looks over the edge to see the person laying against the tree, the worm temps the spider to jump over the edge, the inch worm jumps over, the spider is now pumping its self up to jump off whilst the camera is getting the different shots of the spider.

The camera then goes into the spider so that we see what the spider sees, we (being the spider) move closer to the edge and goes over the edge to see the person, spiders eyes close and it takes a big breath and jumps off, camera then goes to the bottom of tree to see the spider coming down, the spider latches onto the grass to stop its self from flying back up because the spider is still attached to the branch by is web.

The spider looks up and sees the the inch worm, inch worm gives spider thumbs up, a hand suddenly appears and squishes inch worm, and the spider sees the hole thing and lets go of the grass and flings back up to the branch, the end!
Character and Narrative: Environmental Designs Development
For the environment Oscar and I wanted to create a simplistic style, so we came up with making most things square like but with rounded edges. We also wanted to make the tree have holes in it so that we can manipulate the camera through the tree.
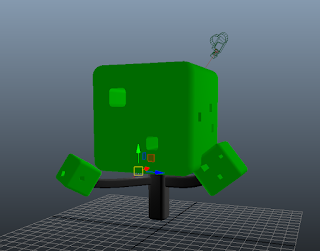 I tested this out by using a CV curve tool and creating a straight line through the tree so that the camera can latch on to it and flow down the hole in the tree to the branch. It was easy enough to create so I will be doing this hopefully in our final animation.
I then gave the UV texture maps for the tree to Oscar so that he could take them into photoshop and draw some textures onto them. Oscar started off with creating different textures for the leaves and different pattens as well, including square dots, multiple square dots in different sizes, strokes of green and just random green dots.
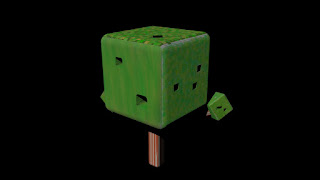 We put the texture on the tree and then looked at different ways of seeing the texture on the tree. Doing this helped us decide which patten on the texture we wanted to go for.
I also tested out what the pattens on the texture would look like when I added in light into the situation. This helped show how the textures would look when you look at the holes in the tree and it shows how the colours would react with different lights.
On the left are some UV texture maps showing different pattens and how putting the pattens in different places on the UV texture maps can change when placed on the cube.
Oscar experimented in different ways of putting pattens in different places and we can up the right designs for the tree which are shown at the bottom. The textures we went for is the squared dots with different shades of green and the bark was again different square dots coloured brown with lines which represent the lines on the tree bark.
 I tested this out by using a CV curve tool and creating a straight line through the tree so that the camera can latch on to it and flow down the hole in the tree to the branch. It was easy enough to create so I will be doing this hopefully in our final animation.
 I then gave the UV texture maps for the tree to Oscar so that he could take them into photoshop and draw some textures onto them. Oscar started off with creating different textures for the leaves and different pattens as well, including square dots, multiple square dots in different sizes, strokes of green and just random green dots.
 We put the texture on the tree and then looked at different ways of seeing the texture on the tree. Doing this helped us decide which patten on the texture we wanted to go for.
I also tested out what the pattens on the texture would look like when I added in light into the situation. This helped show how the textures would look when you look at the holes in the tree and it shows how the colours would react with different lights.
On the left are some UV texture maps showing different pattens and how putting the pattens in different places on the UV texture maps can change when placed on the cube.
Oscar experimented in different ways of putting pattens in different places and we can up the right designs for the tree which are shown at the bottom. The textures we went for is the squared dots with different shades of green and the bark was again different square dots coloured brown with lines which represent the lines on the tree bark.
Character and Narrative: Character Development
Now that I've finished on what the spider looks like I could now finalise and draw up neatly in photoshop so that I can get a better understanding of the final outcome.
My character will have defining features like it having a big butt, two big eyes with smaller ones next to them, and its legs being short and stumpy so that its harder for the spider to get around.
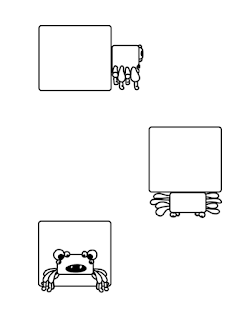 Looking at my character model I feel like some bits might be hard to do on maya like rigging it because I'll have to create a IK spline so that it makes the spider spring up and down when its walking. Also modelling the mouth may be hard because I'm not really sure how to do it, but I'll get to that later on.
After finalising the character I then decided to add colour to the spider, however I'm not so pleased on the colours I've chosen so when it comes to the interim crit I will ask about the colours I should use for the spider.
I was worried about making the spider brown because most of the time the spider will be on the tree branch so it might clash with the colour of the tree as well.
Thursday 22 October 2015
Character and Narrative: Creating a skeleton
In this session of maya we had to create a skeleton for the model using the joint tool. We started of with the left leg then went up to the arm, then spine and then ended with the head and eyes. Whilst creating the joints and everything I also had to go through and rename what ever joint was meant for, this was so that went it came to mirroring the skeleton it would be mush easier and so that I wouldn't have to rename the right side as well. The hardest part about creating the skeleton was putting the joints in foe the forearm roll because the joints had to be straight so I had to use a CV curve tool and make a straight line with that and then attach the joint tool onto it doing this created a straight joint from the elbow to the wrist. After I finished one side of the skeleton I could just mirror it to the right which was easy because all I had to do was press a button and the joints would mirror on the right. Another thing that was that we had to create a root joint which would allow the hips to move separately from the spine, this was also a bit tricky but once I got the hang of it, it was simple enough to follow.
Monday 19 October 2015
Character and Narrative: Character Design
For are story Oscar and I wanted to create two characters that are totally opposite to each other but have different personalities to what you'd think they'd have. So to do this I've come up with a spider who is a massive wimp, who's scared of heights.
What I wanted the spider to be like was that he would have a square-ish body so that he'd fit in with the environment and also be a bit goofy by like having big eyes and bottom. I also wanted the spider to be and act sluggish and goofy, but also the spider fits in with the style of the environment where we make it look blocky. For the eyes and everything like that I'm going to make them on the outer edge of the face, and have the mouth like in the head.
With the legs, I wanted to make them long and thin but after speaking to oscar we've now decided on round and short legs. This is because we wanted the spider look pathetic and it's hard for the spider to move about.


Tuesday 13 October 2015
Character and Narrative: Character and Short Story Design
In this seminar we had a lecturer Sara Barbas talk about how to make good characters and how to make an effective short story. the lecture consisted of telling us the process of an effective story, which was to make sure your character design always serves a story, that you must have ideas/thumbnails/sketches before producing anything, practice life drawing and to always find reference and do your research.
She also told us about style and functionality and that you need to know your target audience or find the right platform for your product. Also to know what genre your product should go under and to know the technique and movements your characters have/do.
Next Sara Barbas talked about the 'Key Elements' in character designs and what they were. For example:
- core shapes
- 3D form
- line of action
- asymmetry
- silhouette
- contrasting elements
- facial expressions
- colour, texture and rendering
- iconic
Character and Narrative: Environment Moodboard
I've also done a moodboard on environmental surrounding because we're wanting to have a stylised environment, so it will be pretty and simple to design. The style we were going for was square trees but rounded square trees, if that makes sense? We're also wanting to place holes in the trees so that when the camera and the beginning pans round the camera can actually go though the trees as well.
Oscar and I looked at loads of different designs and shapes for trees and we looked at trees in video games because trees in video games are simplistic and sometimes retro.
Character and Narrative: Spider Character Moodboard
For are animations Oscar and I looked at different designs for spiders and how one could be created in maya. We were mainly looking for simplistic and durpy look, we were also looking for spiders that had big back sides because we're wanting are character to be over proportion but timid.
Character and Narrative: UV Texture Mapping on Maya Model
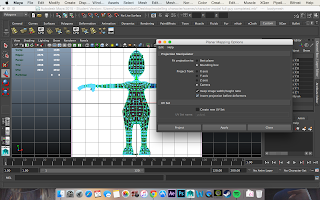
Now that I've modelled my Maya character I then had to give it a UV texture map, which it already had but if you went onto the UV texture mapping screen you would of seen a bunch of lines scattered all over the place like someone's just scribbled on a piece of paper. We had to give it a new UV texture map because it will make adding texture to the model easier later. I did this by going to the 'create UV's' menu and then went to 'planar mapping options' and made sure that 'bounding box', 'camera', 'keep image width/height ratio' and 'insert projection before deformers' boxes were ticked before clicking 'Project'. Doing this will make a 3D UV texture map of the model, which is better that all the squiggly lines before, however not the fine step of creating the UV texture map. After creating the 3D texture map of the model I used the 'cut UV edges' tool to separate the model into 9 parts (head, 2 arms, 2 hands, 2 legs, 2 feet, and 2 souls).
Afterwards, I then had to cut down one half of the arms, legs, souls, and head so that when I unfold the 3D texture it will flatten correctly. Luckily there is a tool in maya that does all of the flattening for you and it's called 'Unfold 3D', which basically takes the 3D texture map and unfolds it like a net for you and then all you have to do is neaten the UV texture map up afterwards so you understand what/where everything is.
Overall I found this quite challenging because a part of my foot on the model didn't get UV textured properly for some reason, so I had to get my tutor to help my sort that out but when my tutor tried to sort it maya kept crashing on me. I finally got maya to stop crashing and we sorted it out and now my UV texture maps are good.
Thursday 8 October 2015
Character and Narrative: Creating Our Demo Character in Maya Part 2
In this session of maya I created a foot, head and hand for my demo character, and found that it got a bit harder to do that because of the amount of times you have to keep switching from the front view the the perspective view just so that you haven't made any mistakes. I also had to keep making the character go into smooth mode to see what it would look like and to see if it looked semi realistic because I don't won't the character dropping into the uncanny valley.
Starting with the foot was simple enough to follow because it's just extruding it out from the leg and then just resizing the extrusion to make the shape of the foot. the hardest part was just trying not to select vertices and edges I didn't want because then it will start deforming and the foot will turn into an abstract foot. I feel like I've done a decent job with the foot but it didn't look exactly like the one in my tutors tutorial but hay no one can get it exactly the same because then it wound be unique.
The head was the second body part I created after the foot, which was harder to make but a simpler shape to model if that understandable? the hardest part was getting the top of the head in the right position, and also the mouth because I had to bevel an edge and then move the edge in on its self and insert an edge loop on the lips so they wouldn't curve as mush. This was hard to do because it was my first head that I've modelled with a mouth, however it was interesting to see how a simple mouth was created and now I feel that I could do it again with out help hopefully.
Next was the hand, which took me three hours to do (but only because I was in the living room with a load of people distracting me). I feel like this should of been simpler however staring at a computer screen for three hours can slow me down and give me headaches. Other than my excuses I had an interesting time seeing how I can make short cuts to create multiple figures i.e. using the duplication tool, plus it's just extruding edges and resizing them to create the hand shape.
Overall I'm quite pleased with my model and I feel like I've learn quite a lot about building a character and how if you think simple about designs, it's easier to model in maya. Also creating a character is simply just about extrusions and inserting new edge loop tools and then just resizing to fit the characters design.
After modelling most of my character we then had to mirror half of the model so that we can get a full one. We did this by duplicating the half model and if you've followed all the guides correctly your model should look fine and normal. I also modelled eyes on my character, which where really easy to do because it's just two cylinders, one of them is hole and the other one is split in half to make the eye lids. I found doing all this was simple enough but if you did have something wrong on one side of the model it won't mirror correctly.
Character and Narrative: The Uncanny Valley
The Uncanny Valley is a hypothesis in that a character or robot can look so human like and move like a human but can be so creepy at the same time. The more realistic you make something the more creepier it will get until you get it to exactly human like. The Uncanny Valley was first identified by a roboticist in Japan named Masahiro Mori in 1970, who said the the more human and life like in the robots appearance and behaviour, the more creepier it would appear, but won't stay like that because it would move to a certain point, in which people would start having weird feelings about the character and sees it differently. This is what 'The Uncanny Valley' is.


Some good examples of the uncanny valley are when you watch movies and see that the animators have used motion captor suites to try and achieve the most human like look in a character, but then there's just something about the character then that makes people feel uncomfortable. One of the movies that make you feel like that it the 'Polar Express' because all the characters have been creacted using CGI and because of that it made the characters have emotionless eyes so they look kind of zombified, which is creepy when you think about it because this film was made for kids.
Another movies which has unfortunately the uncanny valley is the 'Hulk' movie, the 2003 Eric Bana/ Ang Lee version. In this movie the hulk looks like he is made out of modelling clay, plus it had terrifying hulk like dogs and a CGI Nick Nolte.


Monday 5 October 2015
Character and Narrative: Creating Our Demo Character in Maya
In this session we had to create a character in maya from scratch, just so that we get the feel of mayas many tools and how building a character with low geometry will make it easier to model. Doing this will help us when it comes to creating our own character because will have the understanding and knowledge to apply what we learnt ing this session to when we model are characters. There where two main tools we used to create the character and these tools were the 'insert edge loop tool' and the 'extrude' tool, these tools helped by adding new geometry and also extending out from existing faces. Most of the stuff we got taught in this this session I already new because of the amount of practice I've already had in maya, however it was interesting to see how someone else, other than youtube, teaching me how to model in maya.
Creating the model for me was quite simple because of my experience in maya, but we also got tutorial videos from are tutor to go off of and he went through how to build a character step by step so it was easy enough to follow. I felt like I could flow through the tutorial videos with ease, except when I had to stop and help other people around me because they were having trouble with the interface or just modelling its self.
I did have a couple of problems when I was modelling the character but the problem was mainly to do with the computers and college kept crashing on me, so I just decided to model it on my laptop instead.
I didn't manage to complete the character in this session because I started off modelling the character on my own and i didn't follow the videos, and that's where I went wrong because I just confused myself. So I deleted what I did and starter all over again but this time I watched the tutorial videos to help me out. Below you'll see my progress so far and I feel like I've done a good job for now and hopefully it will improve when I finish it off later on.
Friday 2 October 2015
Character and Narrative: Idea Development Part 2
Now that Oscar and I have had a bit of a discussion on the ideas and decided to go for the spider idea because we've changed some parts around and add a new character in the the story. The things that we've changed around is the environment because we wanted an outside environment so that we could model trees, grass and flowers, plus having an outside environment makes it more appealing to the eye and we can add wind for when the spider jumps down to the human.
The new character that we've added to the story is a inch worm, which motivates the spider to jump off of a tree branch. We've added the inch worm because it's a small timid creature which isn't scary at all, which makes it comical that it's telling/yelling the spider to "Just Do It!" We like the idea of the spider being intimidated by a smaller insect imitating Shia Labeouf. We also thought about when the spider jumps down their web gets stuck onto the tree so the spider bounces around just above the humans head flailing around.
The new character that we've added to the story is a inch worm, which motivates the spider to jump off of a tree branch. We've added the inch worm because it's a small timid creature which isn't scary at all, which makes it comical that it's telling/yelling the spider to "Just Do It!" We like the idea of the spider being intimidated by a smaller insect imitating Shia Labeouf. We also thought about when the spider jumps down their web gets stuck onto the tree so the spider bounces around just above the humans head flailing around.
Character and Narrative: Idea Development Part 1
After looking back at are ideas we had a bit of a thing and narrowed it down to two of the ideas I mentioned in the last blog post. We did this because some of the ideas we had were to difficult to design in maya or the movements for the ideas would of been too much for us to do i.e. the fight scene, jumping off things and colliding etc. Plus the environment would of been complicated to make like the space idea or the hooded rivals because we would of had to design and model a street or space and planets.
The two ideas Oscar and I stuck with where the spider jumping off of a ledge and the pet vs pet, this meant we had one from each title (Leap of Faith and Rivals) so we could be more creative in each of the ideas we had.
Leap of Faith- Idea
Starts off with a spider crawling around in the dark, when suddenly the light turns on and the spider is in fear and spreads its legs apart. The light turns off so the spider is relieved, so it starts making its way towards the edge to see what's going on down below. The spider sees a mysterious figure sitting down, the spider is curios and wants to see the mysterious figure close up but its afraid. the spider builds up the confidence and leaps off the edge towards the figure, however realises the figure is actually a human and starts to panic and flail about. The human sees the spider and starts screaming and jumps of the toilet and tries to squat the spider whiles running away.
Pet vs Pet- Idea
There are to pet animals, one of the animals is playing with a toy and having a good time, where as the other animal is sat opposite envious of other animals toy. whiles the animal with the toy is distracted the other envious animal is coming up with a over the top complicated plan to try and capture the toy and play with it. When the animal finally gets the toy the animal realises how stupid the toy is and how the animal is not entertained and throughs it away. The other animal at this point gets the toy back and starts playing with it, this makes the other animal envious again and so it starts all over again.
Character and Narrative: Some Ideas
For the brief ' telling tales' Oscar and I came up with a few storylines and possible titles that would be suitable for the brief. As I've already said in another blog post I've done we are wanting to make the animation comical but simplistic as possible.
The main four titles that stuck out the most in out of the nine were: Leap of Faith, Predator and Pray, Opposites Attract, and Rivals. These where the ones in which we thought would get the most laughs and some of them we could together like Predator and Pray and Rivals. After doing a mind map and coming up with ideas for all for of the titles we realised that two of the four titles we had more ideas for so we decided to drop Opposites Attract and Predator and Pray. This was because all the ideas we were coming up with for the two titles we dropped had already been done before or they just weren't comical enough.
Here are some of the ideas we had for Leap of Faith and Rivals:
LoF
-People jumping off high places into ridiculous objects
-People jumping into space
-Having a spider jumping off a ledge on to a person but the spider being nervous at first and builds up the courage to jump.
-Having someone push their friend into a person they like but awkward situations conjure up
-Have two people jump of opposite ledges to preform an amazing trick and they hype every on up for it but then they both collide into each other at the end.
Rivals
-Typical fight scene but the two people fighting aren't fighting professionally so they're just flailing their arms and legs about
-The struggles between man and machine i.e. man can't get computer to work so is bashing the keys but then the computer gets up and slaps man and runs off.
-Pet vs pet/pet vs owner
-man vs food
-hood rival gangs arguing over turf but insulting each other with tame language i.e. "go suck on an egg!"
Thursday 1 October 2015
Character and Narration: Maya animation
This is a creation I did when I was bored one day and had nothing better to do so don't judge me! I created this using the demo model we got given during are study task "telling tales", which I then manipulated the figure doing a "sassy dance move". I did this because A I wanted to know how difficult it would be to animation the human figure, which to me wasn't to hard because it was just a matter of moving the legs and back and creating some key frames. And B I wanted to put comedy into my animation so seeing what that would look like in maya would be a good reference material to look back on, plus I wanted to see how the human figure would move and act like when I manipulated it.
In my opinion I thing there could be a few changes to be made if I go back and remaster it, thing like make the movements a bit slower, move the arms around to make it more flamboyant and if the model had more anchor points in the spine I would be able to bend the back like an ark. I did make a change before I rendered it out fully which was that the head didn't move at all the first time, so I made the head look forward throughout the "sassy dance move" because that's how it is preformed. I also would render the character out smooth with lighting and colour to make it more appealing and comical to view.
Subscribe to:
Posts (Atom)


