Tuesday, 28 March 2017

Extended Practice: IPI Software Mishap With Different Studio

Due to the fact that the IPI software can only capture a performance 2-4 meters away for the camera, the performer had a very small space to dance around. So I thought that it would be better for me and the dancer to go to a studio that had a big space and mark out the performance area for the dancer, so that they had more an idea of what space she had to perform in.

For the IPI software to work the flooring had to non reflective and the room had to have no natural lighting. So I booked a studio which had padded flooring and blinds on the windows to make sure I had no reflections and natural lighting. However, two problems accrued that day, the fist one being that I could not for the life of me calibrate the software and let it know where the floor was and what space it has. I have know idea why the calibration wasn't working and I mush of tried it about ten different times but they all failed. The second problem was that there was still too mush natural lighting coming into the room even though I closed the blinds, so this made it harder for the IPI software to figure out the depth perception.

I didn't want to just give up so I captured the performance without calibrating the software first because I thought that I could just do that at Uni in the room I've been using before. But when I calibrated at Uni I didn't take into consideration where the cameras where in the studio so when it came to baking the data onto the character, I got two different data projections in the scene because the cameras weren't in the same place as they where in the studio. The image below demonstrates the issue I was having:

As you can see there are two different data projections in the scene so I couldn't position the character into the data because the two projections where from different positions which made one data higher than the other data (if that made any sence?).

This just means I'm going to have to capture the performance again but in Uni and calibrate it properly. And it means that I've just wasted £84 on a studio that didn't work for me.
  

Extended Practice: IPI Second Test With Katy And I

After testing out the software of the first time, I thought it would be a good idea to do another test where I experiment with the software capturing fast motion. So to do this I grabbed Katy, who was also a dancer, and got her to do a couple of dance moves for me testing out the speed of which how fast you can kick a leg and the cameras capturing that speed in good quality. This little exercise I feel went pretty well and the IPI software was able to capture most of the performance. 

I had the character and the data separate when I exported the animation so that I could get a good understanding of how the two looked different and how much detail got captured from the performance. The only problems with the performance on the character is that some limbs do go into the body and also the back does look like it's broke at one point in the animation. The character in this video isn't on that I build I just got it from a software called 'Make Human' as a reference of what a character would look like with the motion capture data on it.
  

I also made another test using myself as the performer to experiment with the different angles and poses you could do in the space that the software could pick up. I also did this so that I could have a go at performing because it looked fun to do. I noticed as well that in my performance the IPI software didn't do well in capturing feel because there is a part in my performance where I stand still and rotate my body left and right but when that got captured the software read that movement as if I was moving my whole body left ad right, which meant my feet was moving like they were hovering.

Extended Practice: IPI First Test

This was the first time using this software and to be honest it was really fun to use. I got my tutor Annabeth to teach me how to use the software and to perform for me. I realised very quickly that when using this software you only get a two meter space from each camera to perform in, so I'll have to rethink the performance that I've choreographed with Sophie (the dancer). This isn't too much of a problem but I will have to set time aside to go to a studio and re-choreograph the performance.

It doesn't take too long to set up the program and record stuff the only tedious part of the program is when you bake the data from the performance onto the character, because you have to watch out for parts of the body not tracking properly. For example the arm could get stuck inside the body and stay there while the data for that arm carries on moving around not baking the arm properly.

There are a few things as well to look out for when using the IPI software, i.e. there are some poses you can do due to your arm or leg won't get captured, your fingers won't get captured and your hand will just have straight fingers throughout the animation, and the motion of your head won't get captured unless you have a Wii remote or a Play Station remote stuck to your head.    

Extended Practice: IPI Motion Capture Software

I'm at the stage to start production now, so this mean its motion capture time. There were two ways in which I was going to capture the performance, the first way involved my tutor Mat and I going to Sheffield Hallam Uni and using there Motion Capture facilities where you use a suit with the dots on and have all the cameras round you capturing the performance. The second way involved me having two xbox kinects and a laptop with the IPI motion capture software installed on it, and someone standing in the middle of the kinects performing and capturing it that way.
In the end I ended up using the second option with the IPI software because unfortunately the facilities in Sheffield Hallam Uni was fully booked until April, which would be too late for me to start capturing then.

The IPI software is used by having one or two xbox kinects, at a 90 degrees angle, pointed at a performer so it can capture the performance using infrared tracking and depth perception. The IPI software is an easy to use motion capture program which offers a 30 day free trial (which I used) so that you can have a taste of the capabilities that the IPI software can product. Using the IPI Software wasn't too hard to do, the only thing I had difficulty doing was the calibration of the scene before you start capturing the performance. This was because of many things like the lighting wouldn't be right, the board used for calibration was either too small or too see-through or just the software couldn't capture the board properly.


Extended Practice: Robot Character Dancing

I've also produced a short dance with the robot character using some mocap samples from the Maya to see how the particles would fall off the character. This animation was only done in low resolution because I was more bothered about the flow of the animation and not the look, I also wanted to see how long it would take for the computers to render this animation. It turned out that it took about 16-20 hour to render the full animation, which is a bit worrying due to the fact that this animation is only 260 frames long and my final animation will be about 2880 frames long. The fact that the animation took this long to render is because I added motion blur to the scene so when it was rendering, the timeline had to scrub through the animation three times before rendering the frame so that it could get a good idea how the particles were going to blur.

Looking at this animation though I will change how the weights are painted on the robot character because the mesh it looking a bit deformed in some poses. I also will change how the particles will fall off the character, and maybe just have a gravity field in the scene so that when the character spins round the particles fly off in the direction of the spin.

Monday, 13 March 2017

Extended Practice: Dissolving The Girl Character

I realised that when I've been testing with the dissolving effect I've been doing it on the robot character, even though in my animation I won't be dissolving the robot character it will be the girl character that's going to be dissolving. So what I did was I used the automatic mapping tool in Maya to unwrap my characters UV texture map, and then used a ramp shader to move along the UV map of the character to create the disappearing effect and to use the ramp shader as the particle emitter. 

This created a different disappearance effect on the characters than the previous tests that I've done on the robot character. This disappearance effect looked like the character was disappearing in little blocks or pixels, which looked quite strange but I presented the animation to my peers and they said that the effect actually suited the aesthetic of my animation. The effect had something to do with the way the automatic mapping unwrapped the girls UV texture map.         


What I'm going to do is create another way of making the girl character disappear so that she does't vanish in small square pixels to see how it looks. If it looks better than obviously I'll be using that way in my final project.

Extended Practice: Cave building

Building the cave I felt was quite a task to do because it was my first time doing it and I didn't really know where to begin. I started by looking online at tutorial videos on YouTube but most of the videos were about building caves in Blender not Maya, however the technique was still the same. I started off by building the cave from a cylinder object and then just deformed the inner side to give it that natural nonuniform look, then I added some stalagmites and crystals into the cave. I also textured the cave using bump maps and normal maps  to give the cave more of a realistic look to it. This whole process took me about one to two hours to create the cave so it didn't take too long and this is what it looks like (sorry if it's a bit dark):


After showing this to Emma she told me that it was too realistic and it won't match the style of her animation, which now when looking at it is right because her animation is quite cartoony looking so this will totally stand out in the animation if I was to put it in there. I'm glad I told her to come and look at it so that she could tell me this now and not later when I'd spend more time in it making it look more realistic. 

So starting again I created simple flat shaped and modelled the cave out of them, so this time I wasn't using a cylinder as a starting point. To create the cave I made four planes and placed them together to make a square, but I also deformed them a little just so that the planes don't look straight and uniformed. I did still have stalagmites an crystals in the cave because that's what Emma wanted but I also added a couple of rocks on the floor. For the water that was going to be in the cave I just made place holders just to give Emma and I some reference so that she knows where the water is when she starts animating. (again sorry if the image is dark) 


Emma much prefers this design than the previous one because it look more cartoony and low poly so it will fit in with her animation well. I used toon shader to texture the cave and to give it that two tone colour look. I also added a mesh glow on the crystals so that we didn't have to create a glow in post production, creating the glow was easy I just went into the attribute editor and in the special effects panel I just increased the glow. One thing that will change about this cave in the colour of it because Emma wanted the colours to be grey and blue, I just did the cave brown for my purpose of seeing how the toon shader would look on the cave.   

Sunday, 12 March 2017

Extended Practice: Animatic

Before creating an animatic you'll need a storyboard however, with my animation there really isn't much story it's just someone dancing and then they disintegrate revealing a robot in there place. So I thought that I'd do an animatic first that shows the main stages on the transformation and what actions the characters will be doing along with the sound track I got from the music student Georgia I've been working with. The reason that the animation doesn't really have a story is because I wanted to create something that demonstrated my abilities and that would look good in my showreel / portfolio. 

Within this animatic I've also placed the video I took of the dancer when we were rehearsing and choreographing the dance so that people would get a better understanding of the movements and the performance in the animation. I've had feedback from people watching this animatic and they've said that they really like the beginning where the dancer walks in-front of the camera because it adds drama to the performance and they've also said that they understand how the girl character will transform into the robot character more wen they watch the animtic. Another thing said was that it might be good if I experiment with the camera angles and have the camera weaving in and out from the characters.          


Extended Practice: Emma's Environments (Cabin)

Starting with the cabin I tried to model it in a old, rundown 'cabin in the woods' kind of aesthetic, but also making the cabin look toony as well. To make the cabin look toony I gave it a curved exaggerated roof and wonky wooden panels. I wanted to have a lot of detail on the cabin just so that it gave the cabin more character and made it look like it had a history. I did this by placing wooden stilts to hold up the roof, making the house stand on rocks and wooden beams and making some of the wooden frames on the fence tilted and worn out. I still feel like expanding the detail on the cabin by adding some stubs in-between the steps and maybe placing a lamp on the side of the porch. 


I also created some UV texture maps for Emma so that she could texture it how she wanted so that the style of the character will match the style of the environment. Below you will see two different texture maps, the fist one is a map of the windows on the cabin. I feel like it demonstrates the layout of the window clearly and when I showed this map to Emma she understood what was going on in the map. I've separated the window texture map from the cabin texture map because they are two different meshes, plus with the windows the character needs to be seen through the window.


The second UV texture map is of (if you've guessed it) the cabin, where I've tried to keep it simple with minimal separations of the mesh to make the UV map flat. The map I feel is easy to follow and some bit are easier to figure out what they are then others. The big rectangle like shape at the top left hand corner is the roof, top right is the end bits of the roof at the back, below that in the back of the cabin, underneath that is the boor rims and just underneath that to the left a bit, is the underneath part of the overhang on the roof. The rest I believe is pretty straight forward and you'll understand what hey are.  


Extended Practice: Environment Design For Emma's Animation

In conjunction with my work for extended practice I'm also collaborating with Emma as a 3D background designer. For this I'll have to design and build environments which match her story and help drive the narrative. I've been given the task to build caves, forests, cabins and bridges, with the toon shader textures placed on to the models so that when I render them out they'll have a 2D aesthetic. 

Emma is wanting a low poly aesthetic to the modelling, this will be ideal for me because it will make things easier to model and it will be every economical with time. Emma has planned out the world for me to model and where every thing will be and hot the character will get to these places. This look something a bit like this: 


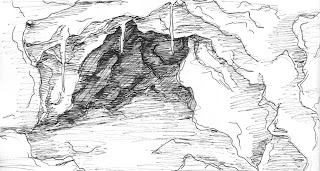
For the cave she has already planned out what the layout is going to be like, this cave includes stalagmites, crystals and a small pond at the back of the cave where the character will fall into. Due to the character being 2D I won't be modelling a pond or simulating a water splashing when the character interacts with the water, Emma will be animating this herself so that the 2D and 3D elements don't clash when they are placed together in post production. Emma also gave me a couple of examples of drawings of the cave that she wanted me to model, here is one drawing she sent me:


She gave me other examples for the rest of the environments like the trees and the cabins but we also created moodboards for the elements that are going to be in the world. We sat down together and went through what kind of aesthetic we could do for each element, and gathered inspiration of how other people have created these kind of elements in other 3D environments. These are the moodboards here:


Wednesday, 8 March 2017

Extended Practice: Environment Design

I was thinking for the environment I just wanted to keep it plane and simple, so I decided to have a dance studio seen as though the main character is a dancer. I started of by roughing out a quick sketch of the studio, I wanted the traditional full mirrored wall and a beam to make the studio look authentic. I didn't want too much detail because if I did the render time would take too long and don't forget the character will be in the scene as well which will double the render time. For the rendering I am using Arnold Renderer due to there realistic looking renders (as you can tell from the second image).


As for the actual 3D image I created in Maya, you can see that I've added a single light on the roof but that might change to more than one light, I've also given the studio a background out of the windows so that it looks like the studio is in the city. Doing that I just placed a 360 image based light around the studio and tried to make some natural light come through the windows. For the texturing I just grabbed some realistic looking textures from google but with the brick wall I will probably bump map it so that it makes the wall look 3D and believable. However, I feel like the mirrored wall will need some work to it because at the minute you can't really tell that it is a mirrored wall, it just looks like a big room that has a beam running through the middle of it.